

As promised, a little tutorial on how I made my mixed media canvas (above) for last week's IAE challenge.
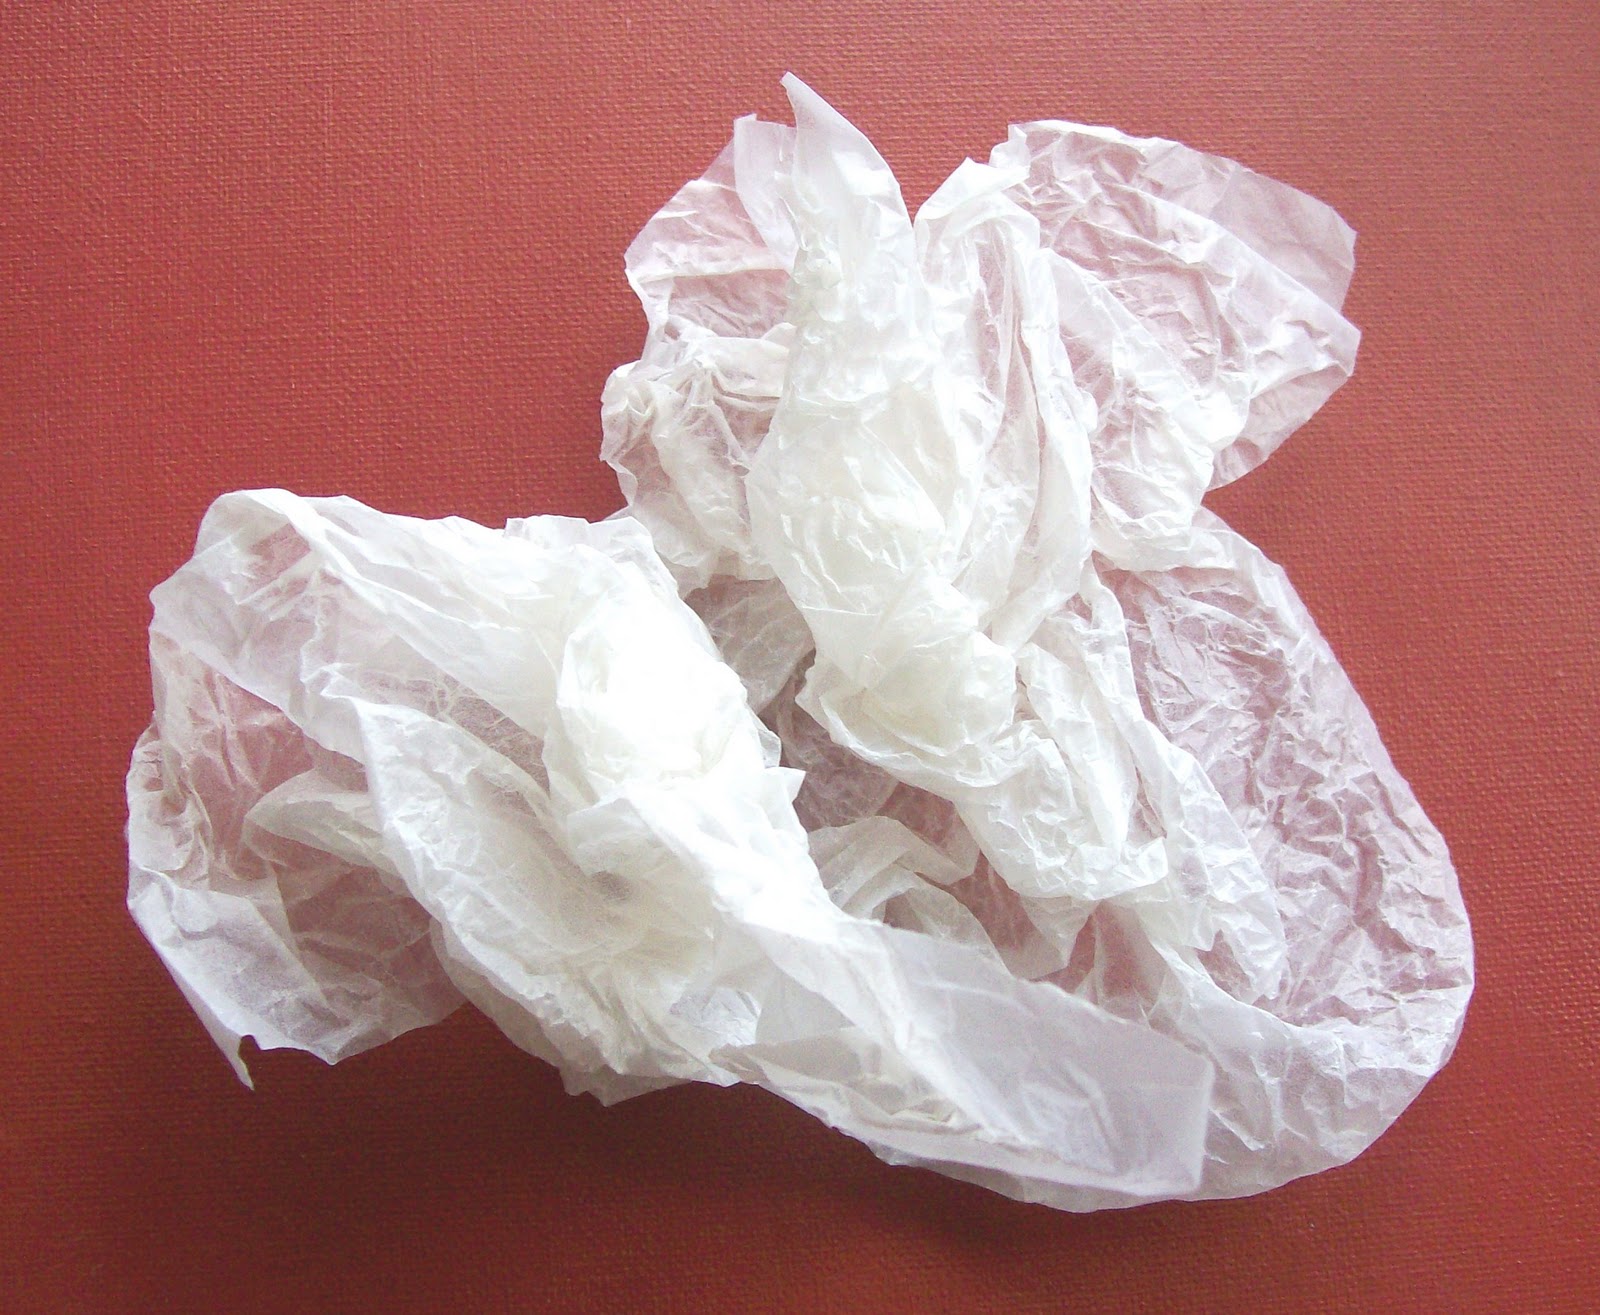
1. Take a sheet of tissue paper (any old tissue paper will do - I save the stuff from old shoe boxes!) and give it a really good crumple so it has tons of creases - the more the better!

2. Glue it to your canvas using a 50/50 mix of PVA glue and water - let it wrinkle and bubble as much as you like, you don't want to smooth out all that lovely texture!
3. When it is completely dry, paint over the tissue - I've used a mixture of Burnt Umber and Burnt Sienna acrylic paints, but you can of course use whatever colours you like/have available. It's best if the paint is fairly watery.

4. Now the fun bit! Once the paint is dry, rub over the whole background with an oil pastel in a contrasting colour - this picks out all those gorgeous creases beautifully! You could also use coloured pencil or even a wax crayon for this step.

5. I've painted some of my collage elements - a wooden heart, a bit of old torn corrugated card, and a little wooden key - in white. I've also cut up and painted a piece of an old laundry bag as I loved the pattern and texture (and I do like to re-cycle!)
6.Other collage elements I've added are a beautifully aged vintage book page, and a wooden button and letters (these have a very light coat of gold acrylic paint so they glisten a little but the letters still show through).
I've also used some scrapbook paper leftover from an old project, and a fragment of the paper that I had underneath the laundry bag when I was painting it (perhaps worryingly, sometimes I like the scrap paper underneath more than my actual work!)
7. Finally, all the elements are glued in place. Shouting "ta-da" at this stage is optional :)
The crumpled tissue technique also works really well with landscape pieces - I've also used it here -


Thanks, Angie, for sharing this fabulous technique! I LOVE both of these pieces, the landscape is stunning!
ReplyDeleteI love tissue paper. I've never done the part with the oil pastels. It looks amazing, especially the contrasting blue color. Can't wait to give it a try!
Thanks Maggie - let me know if you do try it - it's great fun and I'd love to see your version :)
ReplyDeleteGreat tutorial, I love using tissue papers too :)
ReplyDeleteMicki x
A great tutorial, I'm always saving tissue paper from shoe boxes and the like! Might have to try and create a nice piece of art using it :) thanks for sharing
ReplyDeleteOh this is amazing! I absolutely adore your work!
ReplyDeleteand your blog is so fresh and clean and inspirational...and all of your creations harmonize...what a wonderful palette! well done! what a pleasure it is to visit here with you!
ciao bella
creative carmelina
what a fabulous tutorial my fren!! i love what you did with the tissue and you had to use earthy and turquoise together *saliva dripping already* ... and man i was just wondering about that netting element you had ... LAUNDRY BAG of course LOL!! i have loads of those with holes and torn zippers ... YEAH!!! now i can use them. what a brilliant idea!
ReplyDeletenow... i only have to find back the time to do this :)
Hooray! Thanks for sharing this, Angie! I've done the tissue paper thing before, but I don't think I had enough crumples in it...and the pastel rubbed over top...brilliant tip...I am going to try this in my sketch book :)
ReplyDeleteX0X
Very nice. Now I know what to do with that crumpled tissue paper that I couldn't bear to throw away!
ReplyDeleteThanks for sharing you technique! I saw this over at Pinterest.
ReplyDeletelove this tutorial...can i use gesso or gel medium instead of pva glue?
ReplyDeleteI've only ever used PVA Jolene, but I can't see any reason why thin gesso or gel medium wouldn't work. Have fun and let me know how you get on!
DeleteJust found you via Pinterest/Your Paper Pantry. I love your technique and I'm going to give it a try. Your landscape picture is just beautiful.
ReplyDeleteI'm a bit dense...do you put the glue on the underside of the tissue paper, between the paper and the canvas, or is the glue spread over the top of the tissue, like a papier mache-type technique? thanks!
ReplyDeleteThank you gottahavemoxie :)
ReplyDeleteGail I spread the glue onto the canvas, then add the tissue paper over the top. That way I get more control over the crinkles :)
Thanks! This is wonderful, cant wait to try
ReplyDeleteThanks, can't wait to try this!
ReplyDeleteLove your work! Do you think this would work on a wood table too? I've been saving all my tissue paper and my 6 & 7 year olds are DYING to start crinkling!
ReplyDeleteLove your work!!! One question...do you think this would work on a wood surface ? I have a coffee table that I'm trying to make over. I've been saving all my tissue paper and my 6 & 7 year olds are DYING to start crinkling! Let me know! Thanks bunches!
ReplyDeleteThank you :) Yes you should be able to use the same technique on wood with no problems. Though be careful if you want to use the table afterwards - it probably won't respond well to any spills. Hope your kids enjoy their crinkling!
ReplyDeletecan it be applied on drawing paper instead of canvas?
ReplyDeleteAs long as the paper isn't too thin it should work. If you're working on paper though be gentle, and be sure the tissue is fully dry before your rub over it, otherwise the paper may tear.
ReplyDeleteFirst of all that is a beautiful landscape piece! This looks and sounds like a fun tutorial, I'm venturing into the world of arts and crafts, or I should venturing back into it, I use to do them a long time ago, but it's been a while. This is one I'd definitely love to try. It's very cute and inspiring.
ReplyDeleteSarah
http://skylarinc.blogspot.com/
Could I put it on a small wall? I want a patina-like leather finish in my bathroom. This has lots of texture & looks like old leather. Should I put some type of clear varnish over it? I did a technique where I crumpled plastic wrap & dabbed it over brown paint, creating the same effect but no texture. This is Awesome.
ReplyDeleteThanks Sarah, I hope you enjoy your new explorations into mixed media!
ReplyDeleteVicky thanks for the compliment! I can't see any reason why you couldn't do it on a wall, BUT I would be careful putting it anywhere that's likely to get steamy/wet, so I'm not sure a bathroom would be the best place.
If it's a big room and the wall you want to decorate stays pretty dry though, you could try it - in that case a coat or two of varnish would certainly help give it some extra protection. Let me know if you go ahead, I'd love to see it :)
Love this technique, thanks for sharing.
ReplyDeleteI've been looking for a new texture to try with the fan blades I want to make into a dragonfly. Thanks for sharing.
ReplyDeleteI have done this on the bottom half of a wall in a small office. I applied with wall paper paste and when completely dry painted in a dark red/brown color. Ended up looking like leather! If you miss a spot or need to go thicker WAIT until it dries again or paper will begin to tear... Great Ideas in comments!
ReplyDeleteThis comment has been removed by a blog administrator.
ReplyDeletejust came across your page and really enjoyed the technique i love art and looking for something new to try finished pictures are just great
ReplyDeleteGreat blog. Quick question...did you seal the canvas after you used the pastels? Thanks!
ReplyDeleteThanks so much!
ReplyDeleteJess yes you can seal it with varnish, ideally a spray varnish as brushing over the pastels can smear them.
I love the technique I'm so excited to do it with my kids.
ReplyDeleteThank you for sharing.
I am wondering if you could use this technique on a kitchen bar and then seal and protect it with a coat of epoxy? What do you think?
ReplyDeleteHi Tracy. You could certainly use the technique on most surfaces, and the epoxy would give it some protection. It may not last well though if it's used somewhere where it's likely to get a lot of wear and tear or get wet. Saying that I'd probably give it a go - it's a cheap enough technique to try and see what happens!
ReplyDeleteFabulous love the landscape I am certainly going to be trying this at my art class as well as crafting xx
ReplyDeleteMoira
When you painted the tissue paper with burnt umber and burnt sienna, did you paint just one color on first and then let it dry before painting on the other color? What technique and type of brush did you use when painting over the tissue paper? Thanks a bunch....I love this tutorial!
ReplyDeleteHi Janet. Glad you liked the tutorial!
DeleteTo answer your questions -
I mixed the 2 colours together loosely before painting.
I work a lot with acrylics and generally use Galeria brushes, but any brush with soft bristles would be fine for this technique. A brush with a wide head is easiest to use when laying down the paint on a large area.
Hope that helps!
Hallo, meine liebe ich habe grade wunderschöne Bild gemalt, ganz alte Bild habe mit die Technik gemalt ist sehr schön geworden bin richtig begeistert. (mit den Seidenpapier. Danke für Anleitung. Liebe Grüße Ulenka
ReplyDeleteVintage--Kiosk
Oh! I am so going to use this technique on one of my gourd creations! I see so many possibilities for this in my paintings as well. Thanks so much for sharing this!
ReplyDeleteI love the texture you created with the oil pastel. Creative and really cool.
ReplyDeleteThank you Ursula and Beth, I'm glad you found the tutorial inspiring!
ReplyDeleteThank you for sharing! I wonder if chalk pastels would work? I'm going to try it! Inexpensive supplies for an amazing finished product! Hugs, Janice
ReplyDeleteWow I reckon even I could mange this with some lovely results. Thankyou x
ReplyDeleteGlad it's inspired you Lynne!
ReplyDeleteThanks for the tutorial. I have worked on my journal a pair of pages following my artistic instint! ...With your demo-class i have learned some tips that will help me improve "my creations"...will continue you Via Pinterest! is the best to get different sources of art. tfs
ReplyDeleteYou're welcome Petrin, I'm glad you enjoyed using the technique!
ReplyDeleteGreat technique and directions. Can hardly wait to try it. Thank you.
ReplyDeleteYou have certainly inspired me. I cannot wait to make one for myself!!
ReplyDeleteVery Inspiring! Thanx so much!
ReplyDeleteThanks Khara!
Deleteamazing and so simple! Thank you for sharing:)
ReplyDeleteTamara
love this thanks for sharing
ReplyDeleteI am not familiar with pva glue but definitely will give this a shot. Your creations are beautiful and inspiring! Thank you for sharing.
ReplyDeleteThat's a lovely tutorial Angie. You can see from your way to explain how much you love what you do! Keep it sunny!
ReplyDeleteThanks for your kind words Vanessa!
DeleteI'm so excited to find this technique. I'm a crazy art teacher and we are going to build the Lascaux Caves in our building this year. I'm pretty sure I can modify this technique using butch paper to create the cave walls. I'll let you know how it goes.
ReplyDeleteI can see what you mean - I think this would be a great background for 'cave paintings!' Your trip sounds amazing - have a fantastic time!
DeleteReally good tutorial. Very easy to do it. Thanks for sharing your ideas.
ReplyDeletePleasure! I'm glad you enjoyed the tutorial.
Delete