Monday, 27 April 2020

6 Ways To Add Texture To Your Mixed Media Art (Using Things You Probably Already Have At Home)


There are so many ways to add beautiful and interesting textures to your mixed media work! In this tutorial I'll show you some methods using materials you probably already have around the house.

1. Tissue Paper 

This technique works with any sort of tissue paper - even loo roll! Simply crumple up the sheet of tissue and glue it to your paper or canvas. Let it crease as much as you want; the more creases, the more lovely texture!


Once dried, the paper can be painted over. Rubbing a dry medium (e.g. pastels/coloured pencils/charcoal) over the top will bring out the texture even more.


2. Glue

Pour and drip PVA glue from the bottle, making random shapes and patterns. Once it's dry (this can take a while depending how thick your glue is) it can be painted over. 


The parts with the PVA will remain paler, slightly raised and shiny. 


3. Texture paste and stencils

OK, so for the below examples I have used a commercial stencil and texture paste (Galeria modelling paste by Windsor and Newton, if you're interested). 

But if you don't have these supplies on hand, you could try making a homemade 'texture paste' using flour with a little water added. You can also make a DIY stencil by cutting shapes out of cardboard packaging. 


On these 2 canvases I applied a layer of texture paste, then pressed bubble wrap and lace into it whilst it was still wet. I also made some marks into the wet paste with a palette knife.


The picture below is with paint added (zoom in to see the textural effects). 


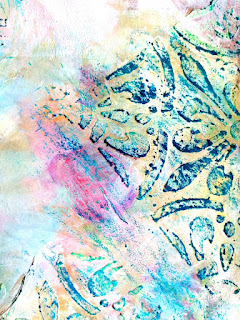
The example below was done on an old painting that I'd started, but wasn't keen on. I laid my stencil on top then pushed texture paste through the holes with an old bank card. 


Once the paste was dry I added more paint, then gently rubbed an oil pastel over the surface to define the raised areas. 


4. Adding ephemera


There are so many possibilities with this one! Keep an open mind and consider trying anything that could give an unusual texture - eggshells, string, corrugated card... 

With this little canvas I glued down fragments of skeleton leaves on to the bottom part, before painting...


 ...and the mixed media collage below includes an old book spine and 3 rusty washers (nothing goes to waste in my house!)


5. Fabric 

Glued on fabric can give some lovely effects. And it doesn't have to be applied flat - I love folds and frayed edges! For the piece on the left I've tried to create little ripples as I was gluing the fabric strip down.


And here they are painted...


6. Scratching into paint

Finally, I love the texture that scratching into a painted surface gives. In this painting I've used a nail to scratch into the paint... 


... for this one, I used the tip of a compass...


This effect can be as subtle or intense as you like (depending on what you're scratching into of course - bear in mind that wood will take much more punishment than paper!) 

I hope you've enjoyed these ideas. If you try any of them I'd love to see your work! 
Stay creative, safe and well :-)

Saturday, 1 June 2019

Cyanotype: Sun Printing Tutorial


We've had some lovely sunny days here recently (it doesn't always rain in Manchester!) so I took the chance to make some cyanotypes... 
I did a short cyanotype course a couple of years ago but this was my first attempt at home.

Cyanotype is a type of photographic process that uses special chemicals that react with sunlight. It's also known as blueprint because of the beautiful deep blue colours it produces. It's a very old technique, invented by Sir John Herschel in 1842. 

If you'd like to try cyanotypes you'll need:

Cyanotype chemicals (Ammonium Ferric Citrate and Potassium Ferricyanide)
Gloves (it's important to wear them when using the chemicals)
Papers
Brush (for coating your papers)
Water
A reasonably good weather forecast!
The chemicals can be bought online: I bought them in 2 separate bottles which you mix together yourself. The mixing is easy to do (equal amounts of each), and means you can make just the amount of solution you need and save the rest for another day!

The first step is to coat the papers you're using with the cyanotype solution (remember to wear your gloves). This is best done in a fairly dark room, because as soon as it's exposed to sunlight the paper will start to develop. 

Quick tip: Bear in mind that the paper you use needs to be rinsed under a tap at the end of the process, so it's best to avoid using papers that are too thin. 

You can save some of the papers if you want to - once they're dry they can be stored in a dark place until you're ready to use them.

Once your papers are dry you can prepare your picture: I've mainly used leaves from my garden but you can use anything you think would make a good image: lace, doilies, keys, ribbons etc. Semi-transparent items can give interesting results, but really the fun of this process is the trying things out and seeing what happens!

Quick tip: You can also make cyanotypes with photograph negatives (example below) or drawings on transparent paper. Basically any dark areas on your original will end up pale on your cyanotype.
Once you're happy with your arrangement, place a sheet of glass on top (to keep the item in good contact with the paper and stop a breeze spoiling your image!), put it out in the sunshine, and wait for the magic to happen! 
Depending on the amount of sunlight the process can take between 5-20 minutes: once the paper has changed colour it's ready to wash. 

Bring your papers inside and remove the objects. This is what mine looked like before rinsing (I actually quite liked them at this stage!): 


You then need to wash your papers under running water for a few minutes to remove the chemicals and reveal the final blues: ta da! 

Quick tip: if your papers have curled up after washing, once dry they can be placed under a heavy book to flatten them again. 

Sunday, 6 May 2018

New Things

It's been a while since I posted here. I've still been creating, but work and life appear to have got in the way of blogging about it!

So, I'll start by sharing some things I've been working on lately...
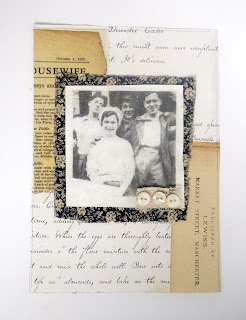
Little textile & paper pieces...the image in the one above is an old family photo transferred to fabric (that's my dad on the far right!)
I've also become a bit obsessed with making little houses! These ones have been collaged with papers, stamps and buttons. 
What have you been creating lately?

Tuesday, 13 June 2017

Index Card A Day Challenge

I'm a little late to the party, but I've bought some plain white index cards...
...and have committed to the annual Daisy Yellow Index-Card-A-Day challenge!
 Anyone is welcome to join in - the idea is simply to create something - anything - on a standard index card every day until 31st July. 
                  This is my first card...I'll be posting each one on Instagram as I go along.